 |
ARTICLES |
Anatomy of a Helicopter crash.
I recently received a phone call from the son-in-law of a former student and friend. He informed me that while returning from a fly-in event his father-in-law was involved in a fatal crash of his experimental helicopter. The news hit me particularly hard because the victim of this crash was one of my former students. I had spent nearly 30 hours strapped into the passenger seat of his helicopter providing him with his helicopter flight instruction. What had gone wrong? How could this happen? There were many unanswered questions swirling around in my mind as I attempted to gain perspective on this tragic event.
Over the next several days I was able to gather bits and pieces of information that filled in some of the blanks in the train of events that led to the accident. There was one witness who heard the helicopter fly over, and then saw it drop vertically from the sky. The helicopter’s vertical stabilizer was found some distance from the wreckage along the helicopter’s flight path. Speculation at first was that the departure of the vertical stabilizer had caused a condition in which the pilot was unable to control the helicopter. It was thought that due to a forward shift of the helicopter’s center of gravity the nose had pitched forward and that it had crashed as a result. It is possible that this may have been a factor in the crash case but other evidence points to another possibility.
It was reported that the helicopter was seen falling vertically without the blades turning. The crash site photos showed an impact crater that looked to be over a foot deep in the soft ground where the helicopter landed. Other photos indicate that neither the main rotors or the tail rotors were turning at the time of ground impact. All of this would indicate the probability that the helicopter had experienced a condition known as Rotor Stall. This aerodynamic phenomenon occurs when the speed of the main rotors declines to the point that the aerodynamic drag on the main rotor blades becomes greater than the engine’s ability to keep them turning with the result being a rapid increase of drag on the rotors leading to their stoppage.
It is needless to say that once the main rotors of a helicopter stop, they can no longer produce lift and the helicopter will from the sky. This scenario appears to be what may have happened in the case we are discussing. One can assume that prior to the vertical stabilizer departing the helicopter it would have made some unusual noise, vibration, or both that alerted the pilot that something was wrong. I always teach my helicopter students “If in doubt, auto out”. This means that if something occurs out of the ordinary; an unexpected noise, an unusual smell, or maybe just a feeling that something is wrong, the first action that the pilot should take is to enter an autorotation, pick an appropriate landing spot, and then if time permits on the way down the pilot can try to determine the cause of the unusual event.
There is one indisputable fact that every helicopter pilot must be aware of and must practice at all times, maintain main rotor RPM. The first law of helicopter flying is “Those who loose rotor RPM will surely die”. It is not a pleasant thought but it is an aerodynamic reality. No matter what happens while piloting a helicopter, it is the pilot’s foremost responsibility to maintain the main rotor rpm within the range prescribed by the manufacturer.
It is likely that my former student became aware of the problem of the vertical stabilizer becoming detached from the tail boom and became distracted by trying to determine the cause of the unusual indications that he was getting. When flying a helicopter without an engine governor, it would be easy to fixate on a problem and to not pay attention to the one indicator that must be maintained at all times, the main rotor RPM needle. The main rotors of a helicopter will stall at some point where the RPM drops below the RPM indicated by the redline on the rotor RPM gauge.
Mark, Jim’s son-in-law asked me to get the word out to the experimental helicopter community on the possible causes of this tragic accident in the hopes that others may not find themselves in the same situation. The Vertical Stabilizer separated due to the builder drilling two holes in the attachment bracket instead of the one hole that is called for in the plans. One of the holes had a sharp nick on it where a crack began and propogated along the bracket until it broke, allowing the stabilizer to depart the ship. See the photo below of the offending bracket.
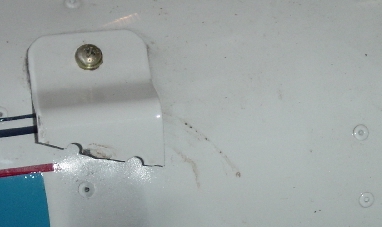
It is very important to check the integrity of the stabilizer bracket before every flight.
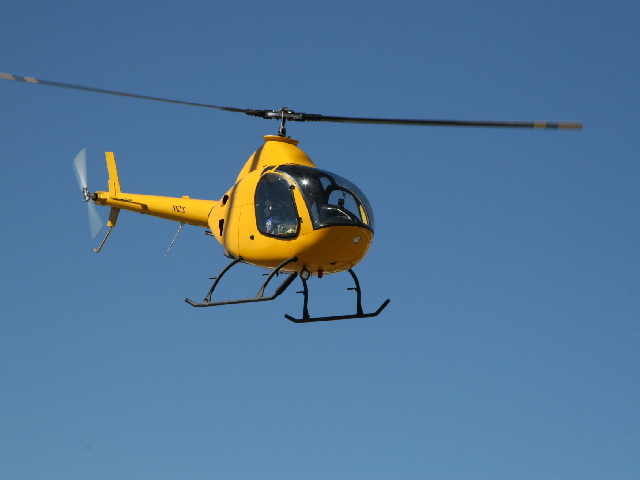
Back in January I received a phone call from the hospital room of another former student of mine. When I first talked with Jim Dorman he had told me that his dream was to fly as a medevac helicopter pilot. I suggested that he gain the required 1500 hours in an experimental helicopter and to then get his instrument ticket in a certified machine. Following our flight instruction sessions, Jim had accumulated over 1400 hours in his Rotorway 162F helicopter. He was having the time of his life flying all over the Kansas City, Kansas area with his wife Mia navigating from the passenger seat. Many of Jim’s flights were with his hangar mate Don (another former student) who flew his own Rotorway 162F.
Jim kept his Rotorway well maintained and flew it at every opportunity. As with all of my students I instructed Jim and Don to check and verify the tension on the tail rotor drive belt in two locations prior to every flight. First a simple squeeze test is performed by reaching up between the frame members at the first tail boom bulkhead. The belt is squeezed and the pilot determines if the belts are tight or loose by the tension felt. The pilot then verifies his findings by using the belt tension tool to check the tension of the rear drive belt. If the belt pulley swing arms are free to move as they are designed the two tension tests will verify one another. If there is a discrepancy in the two tension measurements, the pilot investigates to determine the reason for the discrepancy.
This is a very simple but important check that should be performed prior to each flight. The process is quite simple and fast if the rear body panels are removed. If a belt tension adjustment is indicated the aft tail boom covers must be removed to allow access to the tension adjustment mechanism. The Rotorway helicopters look much better when they are flown with all of their covers and body panels in place. Once they are all in place it takes time to remove them to make the tension checks and adjustments. I always leave these panels off the helicopters when I am instructing a student so that we have easy access to make inspections and adjustments prior to every flight.
Jim and Mia departed from their home airport and flew to New Century airport in Eastern Kansas where they joined up with Don Eikel. Together they flew their two helicopters to the Paola Kansas airport to have lunch at the on-field restaurant. Jim had all of the helicopter inspection covers and panels installed. He used his belt tension tool to check the tail rotor belt tension prior to boarding his helicopter. He noted that the belt tension was on the loose side of the range but still within the factory specified range where it had been for the past 100 hours. Jim recalled that I had instructed him to never run the belts on the loose side of the middle mark but the factory instructions indicated that running the belts in that range was acceptable.
Jim had secured a hangar at a different airport so when they got close to home Jim and Don went their separate ways. The area over which he was flying had plenty of open areas interspersed with patches of dense forest. (Another important technique that I instruct my students to follow is to avoid over flying anything that they do not want to land in. Altitude is our friend and with sufficient altitude we can usually keep our helicopters within autorotation range of suitable emergency landing areas.)
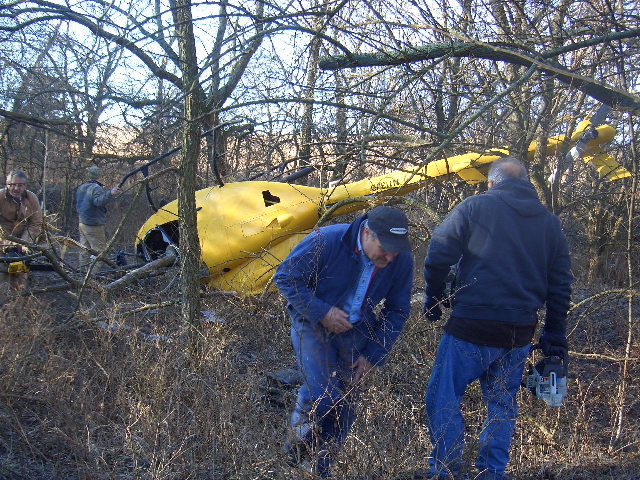
Jim decided to cut across a densely forested area to expedite the trip home. About midway across this patch of forest Jim heard and felt several bangs behind him followed by a left yaw of the nose. He immediately entered an autorotation and looked for a suitable opening in the forest in which to land the helicopter. As he rapidly scanned the area ahead and to the sides there it became apparent that he had only one option, he was going to be forced to flare his beloved helicopter into the tops of the trees and hope for the best.
Jim headed for an area where the canopy looked a bit less dense. He remembered the first rule of helicopter survival: “maintain rotor RPM” and the second rule “always fly the helicopter”. By immediately entering and maintaining an autorotation Jim was able to maintain main rotor RPM in the proper range. Even though his landing options were next to non-existent Jim continued to “fly the helicopter” by maintaining airspeed to allow for the all-important flare that he knew he would need to execute to slow the helicopter as he descended into the forest canopy.
As the tree tops rushed up to meet them, Jim told Mia to hold on as he executed a perfect flare just above the tree tops. He said that he continued to fly the helicopter as it fell through the tree branches chopping wood all the way down. The ride down felt like slow motion to both Jim and Mia. At some point during the crashing, chopping, ripping and twisting ride through the oak tree canopy the helicopter rolled onto it’s left side and impacted the ground as Jim continued to manipulate the controls. Jim and Mia were alive!
As they lay on the ground inside the battered fuselage fuel began pouring from the fuel sender fitting (due to the weak attaching method Rotorway uses for attaching the fuel sender. If you are flying a Rotorway, now is a good time to modify this attachment with rivets or nut plates installed on the inside of the tank flange). Jim yelled for Mia to get out fearing that the helicopter would burst into flames. Before he unbuckled his seat belt he flipped off all of the electrical switches and turned the fuel valve to the off position. He then unbuckled the seat belt and fell to the ground on his back but could not exit the helicopter because his left leg was pinned between the instrument console and a large tree branch. The impact of the crash snapped the pilot cyclic control and it was also wedged against his leg. Mia scrambled out of the wreckage and tried to free Jim’s trapped leg before the gushing fuel might be ignited by the hot engine. It was no use, his left leg had sustained double compound fractures with the bones sticking out of his pant leg and the lower part of his leg was held fast between the instrument panel and the tree.
The couple joined forces and with his right leg Jim pushed up with all of his might on the instrument panel and Mia lifted the nose of the helicopter with all the strength that she had. The wreckage shifted just enough that Jim was able to grab his leg with both hands slide it free. The leg flopped onto the ground with both leg bones protruding from his torn flesh and ripped pant leg. With Mia’s help he was able to semi crab crawl away from the ship.
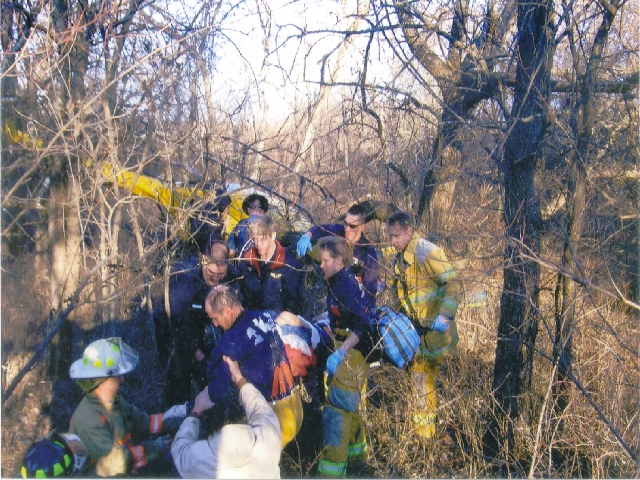
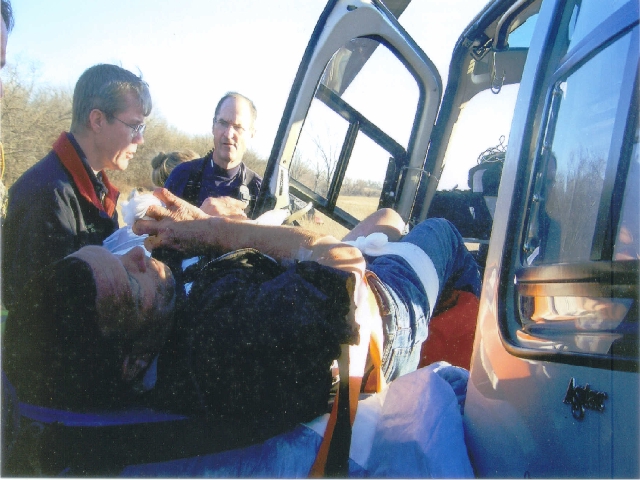
It was immediately obvious that Jim needed immediate medical attention. Since Mia had sustained only a few minor scratches in the accident and because the fuel had not ignited Jim asked her if she still had her camera, she did. He asked her to start taking pictures and those are the photos that you are viewing in this article.
As he lay on the ground he looked around and noticed that laying right next to him were two branches that had been chopped off by the main rotors and a roll of electrical tape that had been in the floor storage compartment. Grabbing the branches and the tape he fashioned a splint to immobilize his leg and then crawled as far as he could from the wreckage. Another miracle was that lying right next to the roll of tape on the ground was Jim’s cell phone. Mia was able to use the phone to call 911 and rescue services were mobilized. The phone had GPS capability that enabled the 911 operator to pinpoint the location of the crash.
Soon rescue vehicles could be heard in the distance and a helicopter seen overhead but the emergency services could not spot the wreckage due to the dense tree canopy. Mia hiked through the dense brush to an clearing where she was able to flag down the rescue service personnel and lead them to her injured husband. He was stabilized and carried to the waiting medevac helicopter that had landed in a nearby clearing and then transported to the Kansas University Hospital.
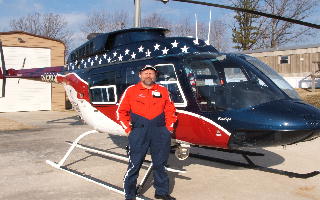
Jim has made a full recovery from his accident and is now flying for Air Evac as a medevac helicopter pilot.
Jim asked me to print this quote from him “If it wasn’t for Orv’s autorotation training, it would not have turned out as well as it did. Orv taught me to always fly the helicopter all the way to the ground. I few it to the trees, through the trees and was still on the controls when I was upside down on the ground. I stopped piloting when it stopped moving. Orv and I must have done 100 or more autos in my Rotorway and it was just natural to immediately enter an auto when I knew we were in trouble”.
Mia added “ Having Orv come to our home to give Jimmy his flight instruction and auto training was the best money we ever spent. The training that Orv gave Jim saved our lives. That is why we invited Orv & Sheila to celebrate our 25th anniversary with us on an Alaska cruise.”
We had a great Alaskan cruise with Jim and Mia this past June. Jim is now in the process of rebuilding his bent Rotorway and plans on having it flying by the spring of 2008. If you remember anything from these stories it should be: 1. Always maintain main rotor rpm while in flight, and 2. If in doubt, AUTO OUT!!.
Jim is now the lead pilot of the Poplar Bluff Missouri Air Evac helicopter
air ambulance company. In spite of this set-back, Jim's little Rotorway
made his dream of flying medevac helicopters become a reality.